Table of Contents
- Introduction to Metadata Repository (MR)
- MR Object List
- PhysicalData
- LogicalData
- CalculateStatisticsTask
- CalculateTestResultTask
- ComputeModelStatisticsTask
- MiningBuildTask
- MiningApplyTask
- TestTasks
- MatchingTask
- TransformationBuildTask
- TransformationApplyTask
- ScriptWrapper
- Trigger
- ScoringCodeBuildTask
- ScoringCodeApplyTask
- MiningFunctionSettings
- TransformationSettings
The Metadata Repository (MR) is a special type of project used for storing and manipulating local or remote Metadata. Metadata is a set of information about the data, estimated models, used transformations, algorithm settings and data mining tasks like model building, testing and applying. Each unit of Metadata information is visible in the form of a small icon in the Projects window. The use of Metadata is particularly well suited for data mining applications because it provides the user with direct access to all the possible information, history of performed tasks, used execution settings, and data transformations. Once used, metadata objects like data transformation chains or model algorithm settings may be easily reused in the next data mining step.
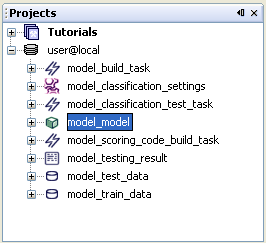
Metadata objects can be easily manipulated in the Projects window component. The user may freely copy, move, rename created objects and organize the workspace in the best suitable way. To save memory, large metadata objects like Physical Data with precalculated statistics or Calculate Statistic Task Results containing huge correlation matrices may by simply unloaded from the memory.
Because the AdvancedMiner architecture supports remote as well as distributed processing, it is worth mentioning that once a user executes a data mining task from a remote repository, all computations are in fact performed on the remote host machine. Thanks to this feature, it is possibleto carry out Data Mining projects involving massive amounts of data by executing the tasks on powerful dedicated servers running several Metadata Repositories independently.
The basic way to connect to a Metadata Repository is to call the Open Repository... action from the File menu.
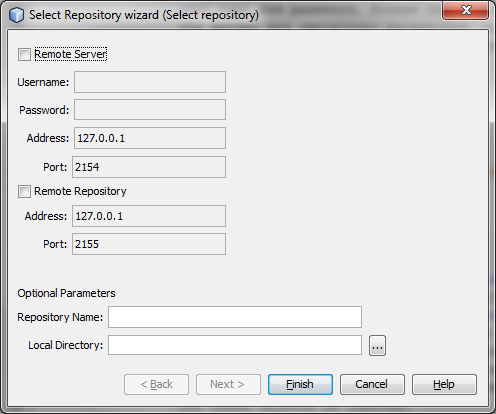
After calling Open Repository... a wizard is displayed. Fill in all fields with the desired values and press the Finish button.
There are two groups of parameters: one for the server and one for the repository. Both have fields for the address and port. These can be the same for the server and the repository, but this need not be the case. The repository group also has fields for user authentication: user name and password. Please contact your system administrator to get the server and repository parameters. Optionally, it is possobleto provide the name of the repository which will be used as its alias.
A repository is represented by the  icon.
It can be used to work with metadata objects which might be on a distant server as if they
where in a local directory. The Connect /
Disconnect actions are available for the Repository
node for controlling the state of the connection with the server. If a
Repository is disconnected, all metadata objects from that file system
switch to the read-only state and the set of actions that can be called
for these objects is limited.
icon.
It can be used to work with metadata objects which might be on a distant server as if they
where in a local directory. The Connect /
Disconnect actions are available for the Repository
node for controlling the state of the connection with the server. If a
Repository is disconnected, all metadata objects from that file system
switch to the read-only state and the set of actions that can be called
for these objects is limited.
Different icons are used for representing specific data objects in AdvancedMiner. They help to identify the type of data objects in various places of the platform, e.g. nodes in the Projects component or tabs in the Editor.
Table 12.1. Important icons
| icon | what it represents |
|---|---|
 | Gython script file |
 | CSV file |
 | CWM object, if no other is icon specified |
 | Attribute set like physical data, logical data, signature |
 | Collection of some elements |
 | Attribute |
 | Mining function settings |
 | Algorithm settings |
 | Mining model |
 | Model statistics |
 | Task |
 | Transformation |
 | Result set |
 | Lift |
 | ROC, other charts |
 | Confusion matrix |
Some modules of the AdvancedMiner platform may introduce new icons for representing their own data objects.
Reference means that one object points to another. This relation is used to represent metadata objects: if one object refers to another object then that object is represented by a child node in the project tree. There are three types of references:
owned - this is the most common type and no badge is used to represent this kind of reference. An owned reference means than an object contains other objects in pretty much the same way that a folder can contain other folders or files. Unlike folders and files, an object and its owned references are physically stored in the same file;
named - an object can refer to another object placed in the same directory by its name. This type of reference is indicated by a blue arrow badge
 attached to the top right corner of its icon
(see the table Badges for a list of all
badges);
attached to the top right corner of its icon
(see the table Badges for a list of all
badges);
id - this reference is similar to named, but the object is referenced by a special distinct property called the identifier (the name of the object can change but the identifier is always the same); this type of reference is represented by a yellow arrow badge
 .
.
When an object uses a reference by 'id' or 'name' and the referenced object does not exist a red error badge will appear on its icon.
Table 12.2. Badges
| Badge | what it means |
|---|---|
| Badge | what it means |
| Named reference |
| ID reference |
 | Named reference, but target of this reference does not have to exist(no error badge is attached) |
 | Error |
 | Warning |
 | Conflict |
 | Object has changed |
 | Request to execute was sent to the server |
 | Object is being executed |
To create a reference choose the Add action from the node's context menu (accessible by right-clicking on the metadata object node). If only one type of referenced object can be added e.g. Cost Matrix, there will be an Add Cost Matrix action. If more then one type can be added, there will be a general Add... action, which will display a submenu with all the possible types.
After choosing the type of the referenced object, a wizard for the creation of the reference will appear. If there is more than one type of reference, the first step is to choose the type of the reference (note that only the allowed reference type is enabled):
owned [new] - a new object will be created from scratch using an owned reference for it; this will launch the same wizard as for the creation of a new metadata object;
owned [existing] - a new owned reference to a new copy of an existing object will be created;
named - a named reference will be created; only objects corresponding to the selected type can be chosen; the user can also type the name of the referenced object;
id - similar to 'named';
Note
If there is only one allowed reference type and there is no need to choose a creation method or its parameters, the wizard will not be shown and the referenced object will be created immediately.
Unless a reference is read-only it can be deleted using the Delete action from node context menu or by pressing the Delete key.
It is important to understand the difference between adding a new reference and creating a new object - a reference is added as a part of an already created object, while New creates a new, independent object, which has its own physical representation. A referenced object cannot be manipulated.
All data objects can be moved, copied or deleted, some may also be opened. To perform these operations just call the appropriate actions for the object.
Objects can also be moved within the Projects tree by dragging and dropping. This is equivalent to cut/paste actions.
When a metadata task object is placed inside the Repository it can
be executed. Use the Execute action (accessed through the
node's context menu, the main menu Run,
the  button on the main
tool bar or by pressing the F6 key). First the
badge is shown. It indicates that a
request to execute the object has been send to the server and the
Execute action for this object is temporarily disabled.
If the server starts executing this task/transformation, the badge changes
to , and disappears
after the server completes the execution. Then the
Execute action is re-enabled.
button on the main
tool bar or by pressing the F6 key). First the
badge is shown. It indicates that a
request to execute the object has been send to the server and the
Execute action for this object is temporarily disabled.
If the server starts executing this task/transformation, the badge changes
to , and disappears
after the server completes the execution. Then the
Execute action is re-enabled.
Note
If Execute is called on an unsaved task/transformation, the platform will try to save it first.
After an object is changed by the user, a badge indicating that its
state is not saved appears: .
The user can save the object
by calling the Save action (accessed through the node's
context menu, the File menu, the
Save button on the main tool bar, or by pressing
Ctrl+S).
When the user has changed a metadata object, he can reload the original object using the Reload action (available only through the node's context menu). All changes done to the object will be lost.
Because the AdvancedMiner environment is highly distributed it is
possible that the user will modify some objects using a task running on
the server and in the meantime change it locally but not save the changes.
This is a conflict situation for this object, which is indicated by the
conflict badge: . To
resolve the conflict the user can either save the local changes and drop
the changes made by the server or he load the changes made by the task
(using the Reload action) and drop the local
changes.